One of the best ways to get a clean and organized home is to simplify your stuff.
I am 100% convinced that preparation makes all the difference when it comes to simplifying your stuff.
To streamline efficiently and effectively, you’ll want to create a decluttering toolkit. This will save you loads of time and effort when it comes to simplifying your stuff.
Create a Decluttering Toolkit
To create your own decluttering toolkit, here are the items I recommend having on hand:
SUPPLIES NEEDED >>>
o Foldable fabric boxes (for small decluttering projects) OR storage containers (for big decluttering projects)
o trash bag(s)
o marker and painter’s tape OR labels
1. BOXES
How many boxes?
I know it seems like a lot, but I recommend having six boxes (plus a giant trash bag) in your decluttering toolkit.
Here’s why. The most difficult part when trying to simplify your stuff is making decisions. When you are trying to make decisions quickly, the last thing you want to think is,
“I’m not sure what to do with this. I’ll just put it back and deal with it later.”
WRONG.
You don’t want to deal with it later. If you’re honest with yourself, you WON’T deal with it later. That’s how you got in this overstuffed predicament in the first place!
Six boxes labeled appropriately will help you make a decision and move on.
What kind of boxes?
I’ve listed two options for types of decluttering containers – large and small.
Use the large boxes if you plan on decluttering your entire house in a short amount. If you’re ready to get going and you don’t have storage containers, just search around your house for any type of box, basket, or container.
If, however, you plan to declutter gradually, then smaller boxes should suffice. I recommend these foldable fabric boxes for two main reasons:
1. You can condense the boxes by folding them up when not in use, and
2. The boxes can be used as storage when you finish decluttering.
2. LABELS
After you find your boxes, the next VERY IMPORTANT STEP is to label your boxes. (AKA giving each box an identity – value – and most of all PURPOSE!)
Since you’ll be making decisions on every single item in your room, you’ll want to make decisions as quickly as possible. Clearly seeing what box (what category) each item should go into will eliminate some of the brainpower needed to make decisions. It’s a simple solution, but it works.
 [1]If you are using big decluttering boxes, go to printable’ s and download decluttering labels to tape to the box.
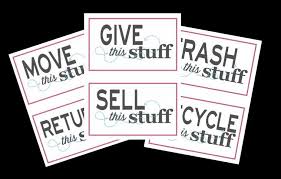
If you’re using the foldable fabric boxes, you might prefer these labels.
If you’re using random boxes, containers, or baskets, then a big ol’ marker and painter’s tape (or even a piece of scrap paper and tape) will do the job perfectly!
What categories?
I recommend getting a big trash bag (and your recycling box) and then using the following categories for your boxes:
Return – for those items you need to return to the store or your friend/family member.
Move – for those items you need to move to another area in your house.
Give – for those items you plan to donate or give to another person.
Sell – for those items you list on Craigslist, eBay, Facebook training post, or sell in a garage sale.
Maybe – for those items you’re not sure what to do with during this first decluttering session. This could just be a pile the first time through…then make a decision the second time through.
Keep – for those items you know to be useful, helpful, or beautiful. This could just be a pile since you are going to put the items back in place.
If you’re in the super colossal decluttering mood, you can simplify with only two categories: the big “Throw it Away” trash bag and the much smaller “Keep it” pile.
If you aren’t ready for the two category method and could use some help in the decluttering department, these are my suggested labels.
However, choose what works best for you! You are here to take charge of the clutter that is taking charge of you!
Since I’ve seen firsthand that there are about 2,748 reasons we continue to hold on to items we don’t actually love, use, or need. The extra categories help us logically decide when it’s time to LET IT GO. Let’s consider for a moment:
Have you been meaning to return that curling iron you borrowed from your friend? The “return” box makes it easy to remember.
Has your coffee mug found a permanent home next to your desk? Use the “move” box to remember to move it to the proper location.
Did buys an expensive eye cream but it causes your eyelids to burn like a red hot chili pepper? You feel terrible throwing it away, so use the “give” box to remind you to take it to your sister.
Need to make a few extra dollars with all your kid clutter? Put the surplus in your “sell” box and put it by your computer so you can list it right away.
Having a hard time letting go of a few items? Put them in the “maybe” box. After you see your clean and organized room, it’s likely you will realize it’s not worthwhile to return these items to your clutter-free home.